Some time ago, someone asked on Microsoft Forum how he can create the Global Tasks list, which will be showing all the tasks assigned to the current user from all the sites. This “Blog” entry has been created in response to his question. Hope you will enjoyed.
Steps:
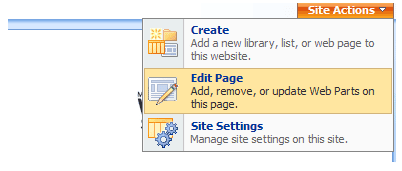
Open the main site, and from Site Actions select Edit Page
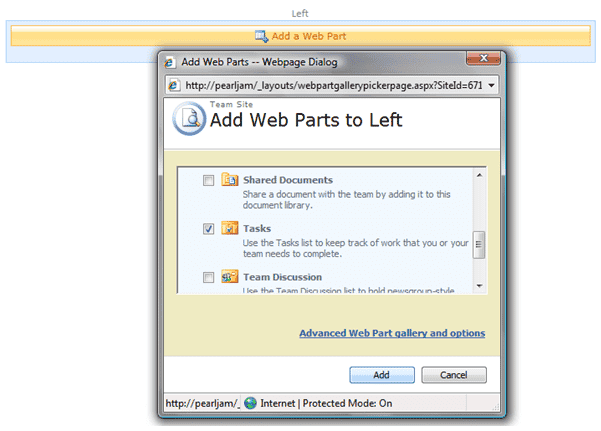
Click Add a Web Part, then select Tasks from the list and click Add button
Site with Web Part should look like on the following screenshot
Open SharePoint Designer
Select File | Open Site and in Site Name type http://localhost and click Open
Double click on Default.aspx site, so it will open for edit (select Split view mode) – if you like you can check out the file before opening or even do the copy of the it and open the copied one so you will not mess with default.aspx file.
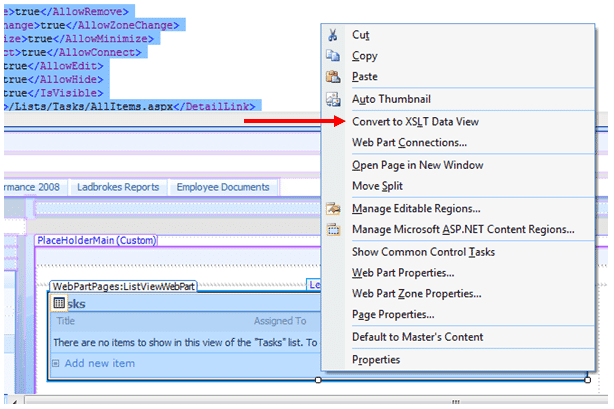
In Design view, right click on the Tasks web part, and select Convert To XSLT Data View
This operation will convert ListViewWebPart to DataFormWebPart, and will generate XSLT code for showing tasks from Tasks list on the main site.
In the Code view find following lines of code
<SharePoint:SPDataSource runat="server" IncludeHidden="true" SelectCommand="<View><Query><OrderBy><FieldRef Name="Modified" Ascending="FALSE"/></OrderBy><Where><Or><Neq><FieldRef Name="Status"/><Value Type="Text">Completed</Value></Neq><IsNull><FieldRef Name="Status"/></IsNull></Or></Where></Query></View>" id="datasource1" DataSourceMode="List" UseInternalName="true">
<InsertParameters>
<asp:Parameter DefaultValue="{F6532524-58C1-4A47-83B2-AE2C87C6E89F}" Name="ListID"></asp:Parameter>
</InsertParameters>
<UpdateParameters>
<asp:Parameter DefaultValue="{F6532524-58C1-4A47-83B2-AE2C87C6E89F}" Name="ListID"></asp:Parameter>
</UpdateParameters>
<DeleteParameters>
<asp:Parameter DefaultValue="{F6532524-58C1-4A47-83B2-AE2C87C6E89F}" Name="ListID"></asp:Parameter>
</DeleteParameters>
<SelectParameters>
<asp:Parameter Name="ListID" DefaultValue="{F6532524-58C1-4A47-83B2-AE2C87C6E89F}"/>
<asp:QueryStringParameter Name="RootFolder" querystringfield="RootFolder" type="String"/>
<asp:Parameter Name="MaximumRows" DefaultValue="20"/>
</SelectParameters>
</SharePoint:SPDataSource>
SPDataSource specify list data source. From the SPDataSource we will need to change two properties: SelectCommand and DataSourceMode.
Change DataSourceMode to CrossList
New SelectCommand should look like this:
<View>
	<Query>
		<OrderBy>
			<FieldRef Name="Modified" Ascending="FALSE"/>
		</OrderBy>
		<Where>
			<Or>
				<Neq>
					<FieldRef Name="Status"/>
					<Value Type="Text">Completed</Value>
				</Neq>
				<IsNull>
					<FieldRef Name="Status"/>
				</IsNull>
			</Or>
		</Where>
	</Query>
</View>
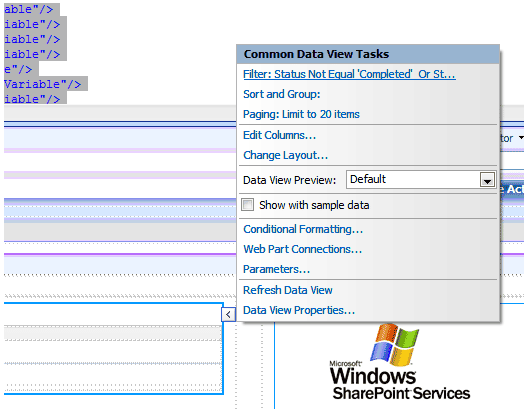
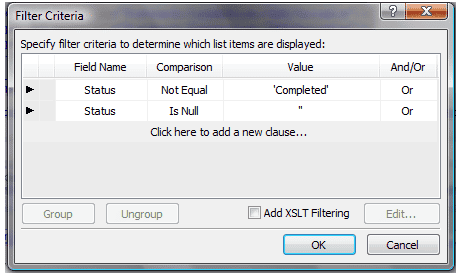
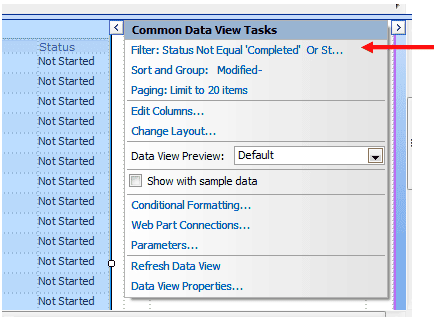
If you would like to change it/modified it, best would be to change it now. Do change it in Design View click on the little arrow in the top right corner of web part and select Filter:….
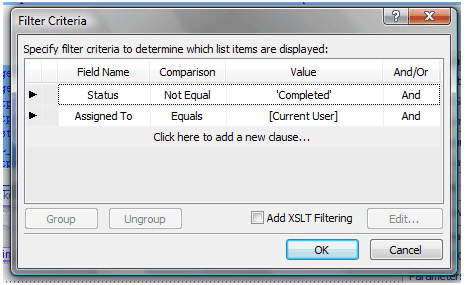
New window will be showed in which you can specify more advanced filter.
Ok, so if you’re done with filter let’s do final changes the Select Command; however If you changed the filter, please copy the new Select Command to Notepad and keep it for reference.
Now, we need to add two tags just after a View tag of Select Command:
<Webs Scope="Recursive"></Webs>
<Lists ServerTemplate="107" BaseType="0"></Lists>
Webs tag with Scope attribute define where to look for the data:
- FilesOnly — Show only the files of a specific folder.
- Recursive — Show all files of all folders.
- RecursiveAll — Show all files and all subfolders of all folders.
Lists tag define what type of list we should query. More information about server templates can be found here (BaseType) and here (Templates).
So, the SelectCommand should look like this now
<View>
	<Webs Scope="Recursive"></Webs>
	<Lists ServerTemplate="107" BaseType="0"></Lists>
	<Query>
		<OrderBy>
			<FieldRef Name="Modified" Ascending="FALSE"/>
		</OrderBy>
		<Where>
			<Or>
				<Neq>
					<FieldRef Name="Status"/>
					<Value Type="Text">Completed</Value>
				</Neq>
				<IsNull>
					<FieldRef Name="Status"/>
				</IsNull>
			</Or>
		</Where>
	</Query>
</View>
Now we need to change every <, > and “ to <, >, &qout; and just in case, delete line breaks, so the Select Command will look like this
<View><Webs Scope="Recursive"></Webs><Lists ServerTemplate="107" BaseType="0"></Lists><Query><OrderBy><FieldRef Name="Modified" Ascending="FALSE"/></OrderBy><Where><Or><Neq><FieldRef Name="Status"/><Value Type="Text">Completed</Value></Neq><IsNull><FieldRef Name="Status"/></IsNull></Or></Where></Query></View>
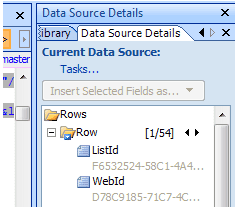
Now, if you save the Default.aspx file, and you will still not see any Tasks, you should update Data Set. Therefore, in SharePoint Designer open task Pane with current data sources.
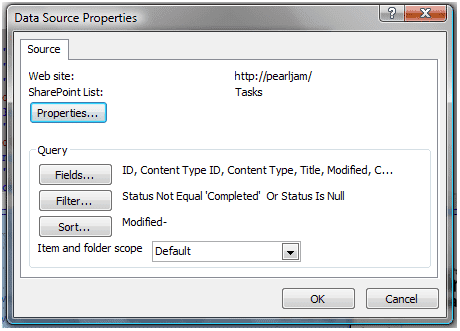
Click on the tasks, the new window will pop up
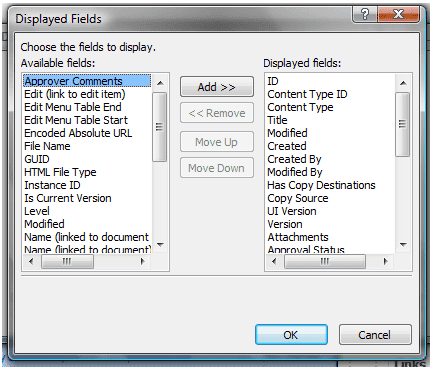
Click on Fields
You should see many fields on the left, now click twice ok, and the current data source will refresh. Now you will see the tasks in web part! Cooool :)
However, we still have few issues:
- Link to the tasks is not pointing to the proper site.
- All tasks are showed (not only tasks assigned to current user).
- Tasks list should still exists on the main site – however we should not need it.
Firstly let’s solve number 2; secondly we will dive into XSLT code to solve number 1 and finally we will make our global tasks web part independent of existing lists:)
To solve issue no 2, we need to click on the little arrow in the top right corner of the web part in design view and select following option
In Filter add new filter with And option (I’ve deleted Status IS Null criterion):
Click OK. Save the file and see if the changes works :)
Now it’s time solve issue with the links! For this, we will need to dive into XSLT code. Find lines with the code for ctx.displayFormUrl and ctx.editFormUrl (displayFormUrl and editFormUrl should exist twice in the code):
ctx.displayFormUrl = "<xsl:value-of select="$URL_DISPLAY" />"; ctx.editFormUrl = "<xsl:value-of select="$URL_EDIT" />";
Change dose lines to:
ctx.displayFormUrl = "<xsl:value-of select="@EncodedAbsUrl" /><xsl:value-of select="substring-after(@FileDirRef, '#')" />/DispForm.aspx";
ctx.editFormUrl = "<xsl:value-of select="@EncodedAbsUrl" /><xsl:value-of select="substring-after(@FileDirRef, '#')" />/EditForm.aspx";
Now find line with code:
<a onfocus="OnLink(this)" href="{$URL_Display}?ID={@ID}" onclick="GoToPage('{$URL_Display}?ID={@ID}');return false;" target="_self">
and change it to:
<a href="{@EncodedAbsUrl}{substring-after(@FileDirRef, '#')}/DispForm.aspx?ID={@ID}" target="_self">
<xsl:attribute name="onclik">
            GoToPage("<xsl:value-of select="@EncodedAbsUrl" /><xsl:value-of select="substring-after(@FileDirRef, '#')" />/DispForm.aspx?ID=<xsl:value-of select="@ID" />"); return false;
      </xsl:attribute>
Save the file and we’re done with another issue :) If you like you can test it. Create the task on the subsite, assign yourself to the task and go to the main page and – click on the task – it should transfer you to the sub site :)
Ok, let’s solve our last issue – tasks list on the main site. Before we began, please copy the code of the webpart to notepad to have a copy of it – just in case :)
From SPDataSource tag, remove following lines:
<SelectParameters>
 	<asp:Parameter DefaultValue="{F6532524-58C1-4A47-83B2-AE2C87C6E89F}" Name="ListID"></asp:Parameter>
 	<asp:Parameter DefaultValue="20" Name="MaximumRows"></asp:Parameter>
</SelectParameters>
<UpdateParameters>
 	<asp:Parameter DefaultValue="{F6532524-58C1-4A47-83B2-AE2C87C6E89F}" Name="ListID"></asp:Parameter>
</UpdateParameters>
<InsertParameters>
 	<asp:Parameter DefaultValue="{F6532524-58C1-4A47-83B2-AE2C87C6E89F}" Name="ListID"></asp:Parameter>
</InsertParameters>
<DeleteParameters>
 	<asp:Parameter DefaultValue="{F6532524-58C1-4A47-83B2-AE2C87C6E89F}" Name="ListID"></asp:Parameter>
</DeleteParameters>
Now, search for the GUID (in my case F6532524-58C1-4A47-83B2-AE2C87C6E89F), and replace it to empty string (this GUID should be listed in two places only).
Now save the file :) and we’re done :) we can delete the Tasks list on the main site and the web part will still works :)










Hi,
i need to display subsite title also….
kindly help me….
@Santhosh
Hi,
There is an issue with getting a Web Name/Site Name from SDP. I was trying different ways to get it from WebId (which is returned in the query), but MOSS/WSS does not provide any JavaScript functionality to return a title. If you would look at the creating of the ctx object, you will see that there is a variable called SiteTitle which should contain a site name. However, SDP is assigning literally “web” string instead of SiteTitle :(
There are two workarounds that I can think of:
1) Create a JavaScript to call GetWeb Webs.asmx web service method, which is taking an URL to site and returns information about the web including title. This solution required an extra webservice.htc file from Microsoft and aprox 3 methods: Init, Get and Results. Web URL can be obtained by parsing Item URL (returned by query). However I do not think that this is a good solution.
2) Own webpart using SPGridView to create a similar table – this solution will be much better then (1) but it needs Server access and some development. If you really needs it, just let me know and I will try to find some time to create it for you.
Hope this helps.
Cheers,
Jakub G
Hi,
This works great except at the bottom right corner of the tasks list where it 1-11. If you click that link, you’ll get 12 -21 except that the exact same tasks are listed. It doesn’t change the tasks. Can this be fixed?
Hi Ivy,
I will try to recreate the webpart during this weekend. As I remember once I had similar issue like you, but during writing this article, I had created aprox 3 web parts, and for sure, paging in the last one was working – the last version has been deployed on client intranet web site and I am sure they would contact me if smth were not working properly.
Cheers,
Jakub G
Hi Ivy,
Finally I found some spare time to spend on the web part. My whole example is based on default view of the Tasks List Web Part. To enable paging I need to recreate the web part but this time I’ve used View editor on the page (Modified Shared Web Part | Selected View | Edit current view) to specify the view on the web part in which I’ve added a query attribute to show only my tasks, and to limit items 5 per page. Then I’ve converted the Web Part to XSLT Data Web Part.
And as I can see from the article the images that I’ve been used has been from the first web part without paging :( Sorry for that :( however during writing of the article I was changing some properties and then I just forgot to include them in the description.
Hope that explanation above will solve all your issues.
Cheers,
Jakub G
Hmmm.. well, I’m a sharepoint novice so I’m not certain how to fix the problem based on the above information. I’m sorry. Do you mind giving me a little more detail?
Hi Ivy,
Yup.
1) Create a Tasks list on your site;
2) Add a Tasks Web Part to Default.aspx or on other page (Web Part Page). This web part will be showed after you create a Tasks list and it will be avaliable in web scope;
3) Click Modified Shared Web Part to open a toolpart on the right side of the screen;
4) First drop down rendered in the toolpart (Selected View) will contain informations regarding View, just below the dropdown you will have a link “Edit the Current View”, click on it – Edit view page will be showed;
5) On edit view page, select what columns you would like to include in the we web part, then go to Filter section and select “And” radio button then from dropdown select “Assigned to” is equal to: [Me] – with brackets;
6) Then in section Item Limit type a number describing how many items you would like to have on the page and select radiobutton: Display items in batches of the specified size. And click “OK” button on the bottom of the page
7) Now again open a Modify Shared Web Part toolpart, and from second drop down select: No toolbar;
8) Click OK
9) Open SharePoint Designer
10) Open a page which contains yours webpart
11) Right-click on the web part and select “Convert to XSLT…”
12) Add this informations to SelectCommand just after <View>
<Webs Scope=”Recursive”></Webs><Lists ServerTemplate=”107″ BaseType=”0″></Lists>
13) Then update ctx.displayFormUrl and ctx.editFormUrl as post describe
14) At the end Save the page and enjoy XSLT Web Part with paging
15) If everything works, you can now reopen a page in SharePoint Designer and do the last steps of the article – removing guids – this will make your’s web part idependent of the Tasks lists.
Hope this helps, if not just let me know and I will try to post a article with screenshots.
Cheers,
Jakub G
Thanks. I will give it a try and let you know.
This is not working for me…
If I change the DataSourceMode to CrossList, then the tasks show up but you can not page through them. They have the same issue…
If i leave the DataSourceMode as List, then there are no tasks listed…
Hi Ivy,
I’m completely brainless, I’m writing an article which use CrossList and then I do not use this param anywhere… instead I’m using List :(
During last two days I’ve done some testing and the issue is that, when you change DataSourceMode from List to CrossList, SharePoint is not sending paging parameters into database, and is using SPSiteDataQuery method instead of SPQuery method.
This means that paging will not be done with pure transforming of the web part, but can be created with some creativity. DataFormWebPart is using XML and XSLT to produce the output to the user. Paging controls created by default from SDP are using PostBack javascript method with parameters that are ignored by code.
If you have aprox 1-2 hours you could create paging by yourself. First we need to add RowLimit (do not add Paged attribute to RowLimit) tag to SelectCommand in View tag, this will limit the items showed to Number, then by JavaScript and XSLT modification we could implement paging.
Cheers,
Jakub G
Thanks for the response… That all sounds very complicated. Perhaps if you have spare time, you could add the instructions on how to do this. i do have 1 to 2 hours for this. I really do appreciate all the time you have taken so far to troubleshoot my issue.
Hi Ivy,
I have better idea, I will create a web part from code, crate a package and I will post it here so there will not be any more issues with the XSLT.
Just let me know if the code Web Part will be ok with you, as some times you just do not have to have appropriate permissions to deploy it
Cheers,
Jakub G
That would be great. Thanks so much!
Why you are remove the GUID,may i know the reason please…
Thank you, it works. Thanks for putting the effort to screenshot the steps, really useful.
@Santhosh
if you will remove GUID’s the web part will not be “connected” to any of the list. Therefore you will be able to place it on the completely new site without modifications. Otherwise, the code will be trying to access the list that dose not exist :(
@Stephanus
glad it worked for you! :)
Great Post!
@Brandt
Thanks :)
Gr8 Post it’s very much use full for me…
thanks Gutkowski
Thank you …. I was trying to link announcement Title Directly to AllItems page, I used your code to remove ‘#’ stng…… Everything is working now.
Dataview
Title
Hyperlink
{@EncodedAbsUrl}{substring-after(@FileDirRef, ‘#’)}/AllItems.aspx
Text To display—> :)
Jakub,
I detached and checked out the Tasks web part, modified it like you described above, reattached and checkedin to default.aspx, but it seems to show only tasks in the top level Tasks list, like it does without modifications. If I assign a a task in a subsite to the same person, it won’t show it.
I also tried moving it from my dev server to another testing server, but it didn’t show any tasks at all.
It’s either I’m doing something wrong or it is not really possible to make it work that way. Please help if you can, I’m really lost here…
Thanks, Roman
I think your way is a little bit difficult for my to make it run smooth in my environment. I will come back one day and try it again when I get used to SPD. Fortunately, I found another blog ran by Liam Cleary (below) and I was able to add additional columns by using table/tr/td. I was initially confused when Heather Solomon mentioned in her blog that you sorta can’t get a grid view as the web part xsl makes it as a row (list). Now I know it is possible. One thing left for me is to add header, which should be easy now.
http://www.helloitsliam.com/archive/2007/07/19/moss2007-%E2%80%93-show-multiple-columns-in-cqwp.aspx
Cheers!
hi
thanks for this – exactly what I was looking to be able to do (I’m a developer, but with very little knowledge of the sharepoint environment)
One thing I can’t seem to get right, and I’m not sure what missed – I have full rights (Admin/site owner) on the site, and edited the default page in SPD as myself. The new (and improved) list show correctly when logged in as me – but shows up as a default task list for everyone else.
any idea how I apply this changed default page to others?
–mark
Mark,
Is page checked out? if so, try check in. if not, try check out and then check in again. Page should be checked in/published and "approved". otherwise changes will be visible to you only.
cheers
Roman,
sorry for delay. I’m sure it was possible as I’ve once have done it. however, I would need to look back at my memos as I think I’ve done something extra after exporting webpart. if you still need a help, please ping my on my mail blog{AT}gutek{DOT}pl
cheers
thank you – works like a charm :)
Comments are closed.